Toolbar Editor for Visual Studio
- Download setup - 3.54 KB
- Download source - 251.66 KB
- Download PDF manual - 1.06 KB
- Download some nice icons - 340.62 KB (link to Tomkat tool article)
Introduction
I usually spend a lot of time to give my projects a nice and user friendly GUI. In my opinion, in all desktop projects, it's "almost" mandatory to give the user something that can speed-up functions that are frequently used. The simpler (and most commonly used) method is to build a toolbar. Visual Studio comes with a toolbar editor but, really, I hate it; it's still limited to 16 colors, it can't load external images, and every time you want to add a new button, it is a pain. For all these reasons, I wrote my own toolbar editor for the Visual Studio IDE.
Installation
Simply run the setup, and follow the on-screen instructions (nothing more than the usual: next, next, yes, yes, next, finish). The setup utility of Toolbar Editor (TE) will also create two subdirectories: temp and imgLib. You can put all icons / images that you frequently use to build your toolbars in the imgLib directory: they will be displayed and previewed in TE so you can easily drop them in the toolbar on which you are currently working on. You should also copy your afxres.h file in the main application directory. See the "Limits of the toolbar editor" section for more information. In my original plans, it would have to be a real add-in of Visual Studio, but the extensibility templates are disabled in my VC++ Std., so I started to write an external tool. Despite this, you can still use TE while your project is open: after you have committed the changes, the IDE will ask you to reload the modified files.
How it Works
You can start to edit toolbars in three steps:
- Open the resource file (.rc) of the project that you want to edit.
- Select the resource ID from the combo box.
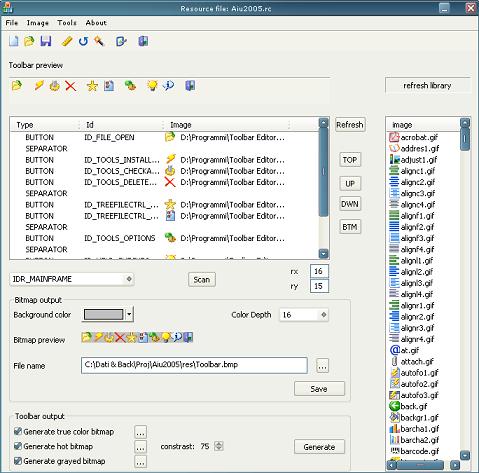
- Click on "Scan" to get the preview of the currently loaded toolbar.
![]()
Now you can add new buttons, move around the existing ones, and so on. Both the toolbar and the listbox used for preview supports drag & drop, so you can easily move buttons using your mouse. On the right side of the dialog window, there is a listbox that you can use as a library; it reads all supported types of images from a folder (if you want, you can change it in the Options) so you can take them and drop on the toolbar (you can also drop new images from the Explorer window). If the image loaded is too big (or too small), you can use the Resize function from the main menu.
When your toolbar is ready, you can click on the "Generate" button to merge it with your project: all needed IDs will be created and added to the resource.h file. If you don't want to modify your project files, you can disable this feature, and the new files will only be created in the temp folder of the editor. By default, the bitmap generated has a 4 bit color depth (16 colors) to maintain the preview active in the Visual Studio editor also, but it's possible to create grayed, true color, and "hot" bitmaps.

The bitmaps will be created in the ./res folder of the currently open project. By default, their names are the same as the toolbar's bitmap, with the _TC, _HT, and _GR suffix, but you can change both the destination folder and the name. You can add these bitmaps to your project, and then use them with some true color toolbar class like Dany Cantin's CTrueColorToolbar.
Let's say that YOUR_BITMAP_TC, YOUR_BITMAP_HT, and YOUR_BITMAP_GR are the IDs of these bitmaps, then you can use them in your OnCreate like:
m_ToolBar.LoadTrueColorToolBar(
        16,
        YOUR_BITMAP_TC,
        YOUR_BITMAP_HT,
        YOUR_BITMAP_GR);
You should 'always' create the true color bitmap because when you will open the toolbar again for editing, it will be used to create the imagelist instead of the 16 color version. Note that this will work only if the true color bitmap is saved using the default name bitmap_name_TC.bmp.
Finally, if you need only the imagelist, you can save it using the Save button in the bitmap section. This won't update .rc or resource.h in your project.
Creating New Toolbars
Even if you are creating a new toolbar, you need a resource file to put it in. For this reason, remember to open the right resource file before starting to work on the new toolbar. After you select "New" on the "File" menu (or you click on the "New" button in the main TE toolbar), the Toolbar Editor will ask for essential info about the toolbar: ID, size, and type (Visual C++ 20XX or Visual C++ 6).
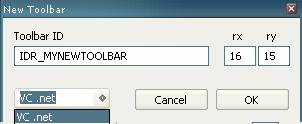
You can choose a new ID also (not previously defined in your resource.h, but be careful: TE won't check if what you typed is a valid ID name, so avoid spaces, special chars, and so on...). After this point, you can work as previously described and, when you are ready, merge the toolbar with the "Generate" button, or copy the toolbar code to the clipboard using the menu entry Tools->Toolbar->Copy to clipboard.
Points of Interest
Well, first of all, I hope that this tool is really useful for someone else other than me. You can also find a custom implementation of a drag and drop enabled toolbar (it works without the Shift button pressed).

Limitations of the Toolbar Editor
There are some considerations about IDs. My editor reads the toolbar structure from the .rc file, and the IDs defined in your project in the resource.h file: it doesn't know anything about any other IDs! So be careful when you edit IDs in the Toolbar editor: if you use an ID already defined somewhere else than resource.h, it can be a problem! In any case TbEditor can read and check for double IDs defined in other files, just add them in the file list available in the option dialog box.
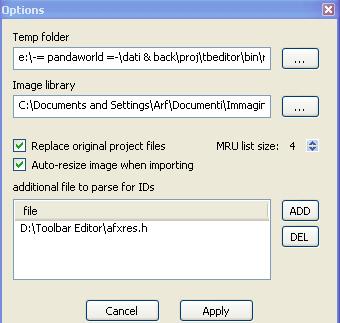
Just a note: The setup package doesn't come with afxres.h because I don't know if that file is copyrighted by Microsoft and/or if it's redistributable. You should copy it to the TE main folder so it will also be parsed to avoid double definitions or you can delete the file in the list and add it from your vs installation path. To put in your .rc file the new toolbars, TE uses as marker, this text: // Toolbar. If TE can't find the marker in your file, the merging of new toolbars will fail (note that this is a problem only for new toolbars).
Guidelines to Compile Toolbar Editor
|
Toolbar editor need Davide Pizzolato's CxImage class to compile. main folder
|
|-- tbeditor source directory
|-- CxImage
|-- jpeg
|-- j2k
|-- jbig
|-- jasper
|-- tiff
|-- png
|-- zlib
where j2k, jpeg, jbig, etc. are all folders that came in the same archive of |
Credits
My work was inspired by Tomkat'ss [^] great tool (Super ImageList and ToolBar generator [^]) that helped me a lot in the imagelist creation before I developed my own tool. I wish to also thank:
- Davide Pizzolato for or CxImage
- Cyril Zekser for Toolbars and Statusbars on Dialogs
- And all the authors of the controls used in this project
History
- 1.0 - (2005/08/02)
- First public release
- 1.1 - (2005/08/03)
- Fixed some compatibility issues with VC6
- 1.2 - (2005/08/05)
- Now it's possible to parse more files with IDs
- Linked statically to avoid dependency problems
- Changed true color bitmap generation checkbox to
trueas default - Now, if available, a true color bitmap is used to create the
imagelistwhen a toolbar is opened - Disabled "error diffusion" in 16 color bitmap creation
- 1.3 - (2005/09/12)
- Added "new" toolbar feature
- Added hot imagelist creation
- Added some accelerators
- Added MRU list
- Improved drag and drop (now you can use it to move buttons also, and replace only the image by holding the CTRL key)
- Fixed bug when two buttons have the same ID
- 1.3b - (2005/10/27)
- Added check for update routine
- Fixed bug caused by MRU implementation (crash on startup)
- Fixed bug with 16 colors bitmap (ugly view in preview)
- 1.3c - (2005/11/06)
- Some internal modification on code to prepare the new release
- Fixed bug on "check for updates routine"
- 1.3d - (2006/07/04)
- Some internal modification on code to prepare the new release (again)
- Better error handling during parsing
- Minor bug-fix
- 1.41 - (2008/01/05) **SHIPON**
- New dialog Layout to handle toolbars up to 48x48px
- Better icon handling: now before use they are all ported to true color
- Added support for png images/icons
- Fixed bug on reopening an existing toolbar without a true color bitmap
- Fixed bug on first toolbar display: listcontrol without icon preview
- Minor bug fixes
- 1.42 - (2009/03/31) **SHIPON**
- New function to select transparent color
- Fixed bug that cause wrong background color selection
- Fixed crash if wrong toolbar id is selected for parsing
- 1.50 - (2011/07/09) **P.WIP**
- Program default data directory moved to
[USERAPPDATA]windows default folder. This is to avoid administrative user rights requirement in Vista/Windows 7. - Added a more detailed manual to the installation package
- Moved to shared MFC linking to reduce EXE file dimension
- Fixed bug on the new function to select the background color
- Fixed bug on first toolbar display:
listcontrolwithout icon preview - Minor bug fixes
- Program default data directory moved to
Additional License Note
This program is free and provided "as is" without any expressed or implied warranty. Use at your own risk!
发表评论
 cheap backlinks[37.233.27.*]2014/7/19 5:18:56#2
PbGH0f Say, you got a nice article post.Much thanks again. Fantastic.
sRuEUo Im obliged for the blog.Really looking forward to read more.