A dialog based Win32 C program, step by step
1. Introduction
When writing pure Win32 programs, usually you see tutorials showing how to use “raw” windows, by filling a WNDCLASSEX structure, calling RegisterClassEx and then CreateWindowEx. This is explained in detail on Charles Petzold classic Programming Windows book – a must-have for any Win32 programmer, let me say.
But sometimes you don’t need to create a new window entirely from scratch, a simple dialog box would fit your needs.
In this article I’ll discuss how to use a dialog box as the main window for your program, step by step, from scratch. A dialog box resource can be quickly created – with labels, editboxes and buttons – using any resource editor. Here I’ll use Visual Studio 2008, but the steps should be similar to other Visual Studio versions, or even other IDEs.
I’ll use pure Win32 C code to keep things as simple as possible: no MFC, no ATL, no WTL, or whatever. I’ll also use the TCHAR functions (declared in tchar.h, more information here) to make the code portable with ANSI and Unicode, and only functions that are both x86 and x64 compatible.
1.1. Program structure
Our program will be composed of three files:
- C source file – the source code we’ll effectively write, and the central theme of this article;
- RC resource script – describes the dialog box resources, easily created by Visual Studio or any resource editor, or even by hand, and compiled with a resource compiler; and
- H resource header – simply the macro constants used on the RC file to identify the resources, usually created automatically together with the RC script.
2. The dialog box
Before writing the C source code, we’ll create an empty project and add a dialog box resource to it. When doing so, a resource script is created, containing the dialog box code. Let’s start a new project:
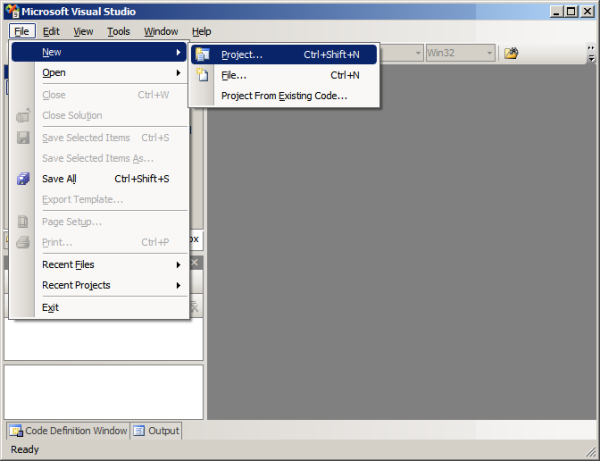
Choose “Visual C++” and “Win32” at the tree on the left, then “Win32 project”, and give a name to it. Pay attention to the directory you are saving it. Then click OK:
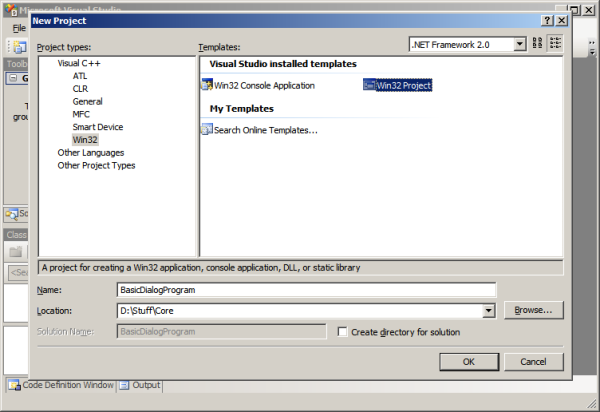
Now choose “Windows application” and “Empty project”. When creating an empty project, Visual Studio will create no files to us, and this is important because here we want to create a pure Win32 program, with no additional libraries. Then, click “Finish”:
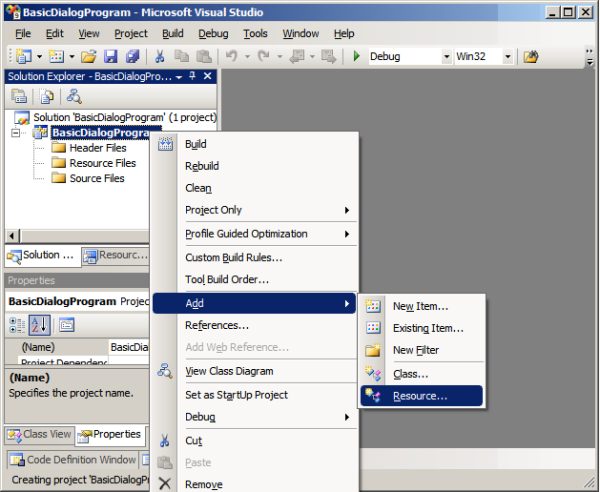
Now, let’s add the dialog box. On the Solution Explorer window – if you can’t see it, enable it on the “View” menu –, right-click the project name and choose “Add”, “Resource”:
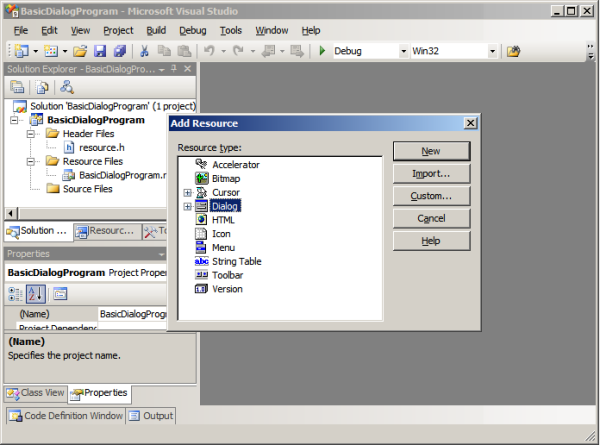
Here you can see a couple of resource items whose script can be generated automatically by Visual Studio. We’ll use just the dialog box, so choose “Dialog” and click “New”:
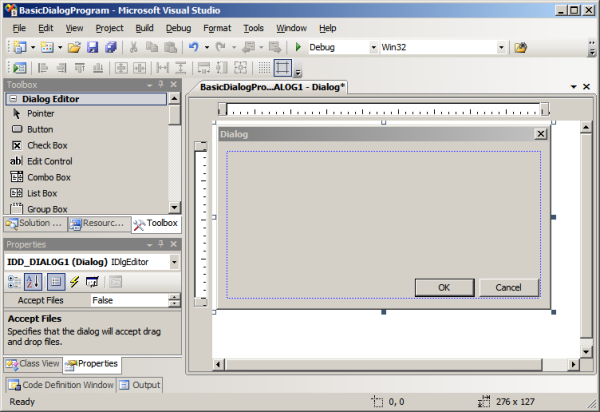
Once done, you should see your dialog on the resource editor, where you can add controls – like editboxes, buttons and labels – by just using the mouse, positioning and arranging them really quick – much quicker than you would do with a “raw window” application, where you must deal with the code directly. My dialog looks like this:
At this point, we have a resource script and a resource header, they can be seen on the Solution Explorer. Now it’s time to write the source code to bring this dialog box alive.
3. The source code
Let’s add an empty source file to our project. On the Solution Explorer right-click the “Source Files” folder, then “Add”, “New Item”. Then give any name to the file, like “main.c”.

On Visual Studio, by default, the source files will be compiled according to the file extension: C files compiled as plain C; and CPP, CXX (and some others) compiled as C++. Here we’ll write C code, but it can also be compiled as C++, so the file extension can be any of those cited. Particularly, I used the C extension, to make it clear it’s a plain C program.
Our C source will have only two functions:
- WinMain – the program entry point, which will have the main program loop; and
- DialogProc – the dialog box procedure, which will process the dialog messages.
Thus, let’s start writing the code with the normal Win32 entry point function (the TCHAR version of it):
#include <Windows.h>
#include <tchar.h>

/* usually, the resource editor creates this file to us: */
#include "resource.h"

int _tWinMain(HINSTANCE hInst, HINSTANCE h0, LPCTSTR lpCmdLine, int nCmdShow)
{
  return 0;
}
4. Dialog creation and message loop
The dialog will be created inside the WinMain function with CreateDialogParam function (instead of CreateWindowEx), and there is no window class registration. Then we make it visible with a call to ShowWindow:
HWND hDlg;
hDlg = CreateDialogParam(hInst, MAKEINTRESOURCE(IDD_DIALOG1), 0, DialogProc, 0);
ShowWindow(hDlg, nCmdShow);
The IDD_DIALOG1 is the resource identifier to our dialog box, declared in resource.h. The DialogProc is our dialog box procedure, which will handle all dialog messages – I’ll show it later on.
Then it follows the main program message loop. It’s the heart of any Win32 program – see it as the bridge between the operational system and your program. It also exists on the common “raw window” programs, although slightly different from this. Here, the message loop is specific to deal with a dialog box as the main window:
BOOL ret;
MSG msg;
while((ret = GetMessage(&msg, 0, 0, 0)) != 0) {
  if(ret == -1) /* error found */
    return -1;

  if(!IsDialogMessage(hDlg, &msg)) {
    TranslateMessage(&msg); /* translate virtual-key messages */
    DispatchMessage(&msg); /* send it to dialog procedure */
  }
}
The IsDialogMessage function immediately forwards the message to our dialog box procedure if it belongs to it. Otherwise, the message enters the regular handling. More information about the message loop can be found here.
There is a possibility to bypass this program loop (not writing it), as explained by Iczelion on the 10th lesson of his wonderful Win32 Assembly article series. However, by doing so, we have less control: we cannot put any verification on the loop, like accelerator handling, for example. So, let’s keep the loop on our code.
4.1. Enabling visual styles
In order to get the common controls 6 visual styles, introduced with Windows XP, you must not only call InitCommonControls (declared in CommCtrl.h), but also embed a manifest XML file into your code. Fortunately, there is a handy trick you can use on Visual C++ compiler, wich I learned from Raymond Chen blog. Just add this to your code:
#pragma comment(linker, \
  "\"/manifestdependency:type='Win32' "\
  "name='Microsoft.Windows.Common-Controls' "\
  "version='6.0.0.0' "\
  "processorArchitecture='*' "\
  "publicKeyToken='6595b64144ccf1df' "\
  "language='*'\"")
This will generate and embed the XML manifest file automatically, and you’ll never worry about it again.
To call InitCommonControls you must statically link your program to ComCtl32.lib, and this can be accomplished with a #pragma comment directive as well:
#pragma comment(lib, "ComCtl32.lib")
4.2. Our WinMain
So far, this is our complete WinMain function (without the dialog box procedure yet):
#include <Windows.h>
#include <CommCtrl.h>
#include <tchar.h>
#include "resource.h"

#pragma comment(linker, \
  "\"/manifestdependency:type='Win32' "\
  "name='Microsoft.Windows.Common-Controls' "\
  "version='6.0.0.0' "\
  "processorArchitecture='*' "\
  "publicKeyToken='6595b64144ccf1df' "\
  "language='*'\"")

#pragma comment(lib, "ComCtl32.lib")

int WINAPI _tWinMain(HINSTANCE hInst, HINSTANCE h0, LPTSTR lpCmdLine, int nCmdShow)
{
  HWND hDlg;
  MSG msg;
  BOOL ret;

  InitCommonControls();
  hDlg = CreateDialogParam(hInst, MAKEINTRESOURCE(IDD_DIALOG1), 0, DialogProc, 0);
  ShowWindow(hDlg, nCmdShow);

  while((ret = GetMessage(&msg, 0, 0, 0)) != 0) {
    if(ret == -1)
      return -1;

    if(!IsDialogMessage(hDlg, &msg)) {
      TranslateMessage(&msg);
      DispatchMessage(&msg);
    }
  }

  return 0;
}
5. Dialog box procedure
The dialog procedure is responsible for handling all program messages, responding to all events. It starts like this:
INT_PTR CALLBACK DialogProc(HWND hDlg, UINT uMsg, WPARAM wParam, LPARAM lParam)
{
  return FALSE;
}
Windows calls this function to every program message. If we return FALSE, it means Windows can carry out the default processing for the message, because we’re not interested on it; if we return TRUE, we tell Windows we’ve actually processed the message. This is slightly different from the “raw” window message handling through WndProc, where you return a call to DefWindowProc function. Here, we must not call DefWindowProc, just return FALSE.
So, we’ll write only the handling to the messages that are interesting to us. Among the most commonly used messages, we have WM_INITDIALOG, WM_COMMAND and WM_SIZE. But to build the minimal functional program, we need only two:
switch(uMsg)
{
case WM_CLOSE: /* there are more things to go here, */
  return TRUE; /* just continue reading on... */

case WM_DESTROY:
  return TRUE;
}
Notice we don’t need to handle WM_PAINT message with dialog boxes.
5.1. The minimal message handling
The WM_CLOSE is called just prior to window closing. If you want to ask the user if he really wants to close the program, here is the place to put this check. To close the window, we call DestroyWindow – if we don’t call it, the window won’t be closed.
So here’s the message handling, also prompting the user. If you don’t need to prompt the user, just ommit the MessageBox check and call DestroyWindow directly. And don’t forget to return TRUE here, whenever you close the window or not:
case WM_CLOSE:
  if(MessageBox(hDlg,
    TEXT("Close the window?"), TEXT("Close"),
    MB_ICONQUESTION | MB_YESNO) == IDYES)
  {
    DestroyWindow(hDlg);
  }
  return TRUE;
Finally, we must handle the WM_DESTROY message, telling Windows we want to quit the main program thread. We do this by calling PostQuitMessage function:
case WM_DESTROY:
  PostQuitMessage(0);
  return TRUE;
The WM_DESTROY message is also the best place to free resources that were allocated by the program and are still waiting to be deallocated – it’s final cleanup time. But don’t forget to do the cleanup before calling PostQuitMessage.
5.2. Closing on ESC
An interesting feature of the dialog boxes is that they can be easily programmed to be closed when the user hits the ESC key, and it can also be done when the dialog box is the main window as well. To do so, we must handle the WM_COMMAND message and wait for the IDCANCEL identifier, which comes in the low word of the WPARAM argument, and that’s what we do:
case WM_COMMAND:
  switch(LOWORD(wParam))
  {
  case IDCANCEL:
    SendMessage(hDlg, WM_CLOSE, 0, 0);
    return TRUE;
  }
  break;
The IDCANCEL identifier is declared in WinUser.h, which is included in Windows.h, so it’s always available.
Notice that when handling IDCANCEL, we send a WM_CLOSE message to our dialog window, what it causes the dialog procedure to be called again with the WM_CLOSE message that we previously coded, so the user will be prompted if he wants to close the window (because that’s the way we coded it).
6. The final program
So here is our final program. It’s the C source code for the minimal functional Win32 dialog based program, with the message loop and visual styles properly enabled, just ready to go. You can keep this to use as the skeleton for any Win32 dialog based programs.
#include <Windows.h>
#include <CommCtrl.h>
#include <tchar.h>
#include "resource.h"

#pragma comment(linker, \
  "\"/manifestdependency:type='Win32' "\
  "name='Microsoft.Windows.Common-Controls' "\
  "version='6.0.0.0' "\
  "processorArchitecture='*' "\
  "publicKeyToken='6595b64144ccf1df' "\
  "language='*'\"")

#pragma comment(lib, "ComCtl32.lib")

INT_PTR CALLBACK DialogProc(HWND hDlg, UINT uMsg, WPARAM wParam, LPARAM lParam)
{
  switch(uMsg)
  {
  case WM_COMMAND:
    switch(LOWORD(wParam))
    {
    case IDCANCEL:
      SendMessage(hDlg, WM_CLOSE, 0, 0);
      return TRUE;
    }
    break;

  case WM_CLOSE:
    if(MessageBox(hDlg, TEXT("Close the program?"), TEXT("Close"),
      MB_ICONQUESTION | MB_YESNO) == IDYES)
    {
      DestroyWindow(hDlg);
    }
    return TRUE;

  case WM_DESTROY:
    PostQuitMessage(0);
    return TRUE;
  }

  return FALSE;
}

int WINAPI _tWinMain(HINSTANCE hInst, HINSTANCE h0, LPTSTR lpCmdLine, int nCmdShow)
{
  HWND hDlg;
  MSG msg;
  BOOL ret;

  InitCommonControls();
  hDlg = CreateDialogParam(hInst, MAKEINTRESOURCE(IDD_DIALOG1), 0, DialogProc, 0);
  ShowWindow(hDlg, nCmdShow);

  while((ret = GetMessage(&msg, 0, 0, 0)) != 0) {
    if(ret == -1)
      return -1;

    if(!IsDialogMessage(hDlg, &msg)) {
      TranslateMessage(&msg);
      DispatchMessage(&msg);
    }
  }

  return 0;
}
发表评论
 matzcrorkz[37.233.27.*]2014/8/6 15:24:04#2
4MaivQ Great, thanks for sharing this article post.Really looking forward to read more. Fantastic.
cg0kAC Thanks so much for the blog article.Much thanks again. Much obliged.