Telerik Extensions for ASP.NET MVC
Introduction
Telerik Extensions for ASP.NET MVC are built from the ground up to fully embrace the principles of the ASP.NET MVC framework - lightweight rendering, clean HTML, clear separation of concerns, easy testability. The Extensions enhance your productivity by letting you remain in control of your MVC views without having to write all HTML, CSS, and JavaScript by hand. Also Telerik MVC Extensions are completely free and Open Source. It’s becoming more and more popular in ASP.NET MVC developing.
In this article, we’re going to have a look at how to use Telerik UI controls in an MVC application.
How to use Telerik MVC Extensions
Add a reference to Telerik.Web.Mvc.dll which is located in the Binaries folder of Telerik Extensions for ASP.NET MVC install location.
Register the Telerik Extensions for ASP.NET MVC namespaces in web.config.
<namespaces>
    <add namespace="System.Web.Mvc" />
    <add namespace="System.Web.Mvc.Ajax" />
    <add namespace="System.Web.Mvc.Html" />
    <add namespace="System.Web.Routing" />
    <add namespace="System.Linq" />
    <add namespace="System.Collections.Generic" />

    <add namespace="Telerik.Web.Mvc.UI" />
</namespaces>
Add the JavaScript files in the Scripts folder of your ASP.NET MVC application. Browse to the Scripts folder of your Telerik Extensions for ASP.NET MVC install location. Copy the subfolder within the Scripts folder. In Visual Studio Solution Explorer, expand the Scripts folder and paste the folder which you copied. Use the ScriptRegistrar component to register the JavaScript code of the components.
<%= Html.Telerik().ScriptRegistrar().DefaultGroup(group =>
     {
          group.Add("telerik.common.js");         // That file is always required
          group.Add("telerik.grid.js");
          group.Add("telerik.grid.filtering.js"); // Include only if filtering is enabled
          group.Add("telerik.grid.grouping.js");  // Include only if grouping is enabled
          group.Add("telerik.grid.editing.js");   // Include only if editing is enabled
          group.Add("telerik.grid.reordering.js");
          group.Add("telerik.grid.resizing.js");
          group.Add("telerik.textbox.js");
          group.Add("telerik.calendar.js");
          group.Add("telerik.datepicker.js");
          group.Add("telerik.window.js");
          group.Add("telerik.draganddrop.js");
          group.Add("telerik.treeview.js");
          group.Add("serverexplorer.js");
      })
%>
Add the CSS files to the Content folder of your ASP.NET MVC application. The CSS files are located in a folder named after the version of the Telerik.Web.Mvc.dll assembly within the Content folder of your Telerik Extensions for ASP.NET MVC install location. Open the Content folder and copy the subfolder within it. In Visual Studio Solution Explorer, expand the Content folder and paste the folder which you copied. You will need to use the StyleSheetRegistrar component to register themes.
<%= Html.Telerik().StyleSheetRegistrar()
    .DefaultGroup(group => group.Add("telerik.common.css")
                                .Add("telerik.vista.css"))
%>
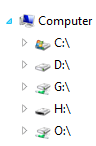
TreeView
What we need to do now is build a folder navigation panel at the left side of the window, like "Window Explorer”. The root folder is “Computer”. Then we can go through all the subfolders.
We add another ContentPlaceHolder in Site.Master.
<body>
    <asp:ContentPlaceHolder ID="NavContent" runat="server">
    </asp:ContentPlaceHolder>
    <div id="main">
        <asp:ContentPlaceHolder ID="MainContent" runat="server">
        </asp:ContentPlaceHolder>
    </div>
</body>
Then in Index.aspx, we render navigation.ascx.
<asp:Content ID="Content3" ContentPlaceHolderID="NavContent" runat="server">
    <% Html.RenderPartial("Navigation");%>
</asp:Content>
Hierarchical Model Binding
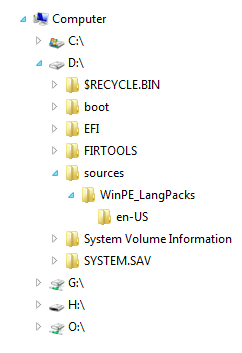
The treeview in Navigation.ascx needs to bind to a Hierarchical Model first to populate the root folder (Computer) and its first level subfolders (C drive, D drive, … ). Then we use the LoadOnDemand feature to populate the next level subfolders.
LoadOnDemand
LoadOnDemand means all root items are loaded and the user can load the children by clicking on the expand icon.
To enable populate on demand for tree item, we use AJAX binding.
.DataBinding(dataBinding => dataBinding
    .Ajax().Select("SubFoldersLoading", "Explorer")
“SubFolderLoading” is the action name, and “Explorer” is the controller name.
Client-side events
The TreeView supports the following client-side events:
- The
OnDataBinding(String)event is raised every time the treeview is being databound on the client-side. - The
OnDataBound(String)event is raised after the treeview is databound on the client-side. - The
OnLoadevent is raised when the component is loaded on the client. To handle theOnLoadevent, use the overload of theOnLoadmethod, which can accept a name of the JavaScript function as a string parameter orAction. TheActionparameter will be directly rendered on the client without any modification. - The
OnExpandevent is raised on expanding of the item. To handle theOnExpandevent, you can use the overload of theOnExpandmethod which can accept the name of the JavaScript function as a string parameter orAction. TheActionparameter will be directly rendered on the client without any modification. - The
OnCollapseevent is raised on collapsing of the item. To handle theOnCollapseevent, you can use the overload of theOnCollapsemethod which can accept the name of the JavaScript function as a string param orAction. TheActionparameter will be directly rendered on the client without any modification. - The
OnSelectevent is raised when one of the component's items is selected. To handle theOnSelectevent, you can use the overload of theOnSelectmethod which can accept the name of the JavaScript function as a string param orAction. TheActionparameter will be directly rendered on the client without any modification.
.ClientEvents(events => events.OnSelect("onFolderSelect"))
Get TreeView Client Object
The treeview client object is preserved in the data store for the treeview element:
var tv = $('#folderList').data('tTreeView');
TreeView Client API
Get the treeview item text:
var tv = $('#folderList').data('tTreeView');
var text = tv.getItemText(e.item);
Get the treeview item value:
var tv = $('#folderList').data('tTreeView');
var value = tv.getItemValue(e.item);
Here is the code of the view template “navigation.ascx”:
<%@ Control Language="C#"
    Inherits="System.Web.Mvc.ViewUserControl<ServerExplorer.Models.FileModel>" %>
<%
    IList<FileModel> data = new List<FileModel>();
    data.Add(Model);

    Html.Telerik().TreeView()
         .Name("folderList")
          .BindTo(data, items =>
          {
              items.For<FileModel>(binding => binding
                      .ItemDataBound((item, file) =>
                      {
                          item.Text = file.Name;
                          item.Value = file.FullPath;
                          item.ImageUrl =
                            Url.Content("~/Content/Images/" +
                            file.Category.ToString() + ".png");
                          item.LoadOnDemand = true;
                       })

                      .Children(file => file.SubFolders))  ;

          })

          .DataBinding(dataBinding => dataBinding
                  .Ajax().Select("SubFoldersLoading", "Explorer")
          )
          .ClientEvents(events => events.OnSelect("onFolderSelect"))
          .ExpandAll(true)
          .Render();
%>

<script type="text/javascript">
function onFolderSelect(e) {
    var tv = $('#folderList').data('tTreeView');
    var file = tv.getItemValue(e.item);
    selectFolder(file);
}
</script>
Here is the code of the SubFolderLoading action in the “Explorer” controller:
[AcceptVerbs(HttpVerbs.Post)]
public ActionResult SubFoldersLoading(TreeViewItem node)
{
    string filePath = node.Value;
    IList<FileModel> subFolders = FileModel.GeFolders(filePath);
    IEnumerable nodes = from item in subFolders
                        select new TreeViewItem
                        {
                            Text = item.Name,
                            Value = item.FullPath,
                            ImageUrl = Url.Content("~/Content/Images/" +
                               item.Category.ToString() + ".png"),
                            LoadOnDemand = true,
                            Enabled = true
                        };
    return new JsonResult { Data = nodes };
}
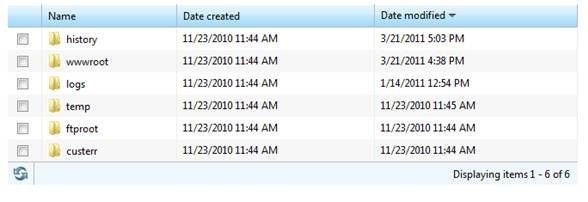
Grid
Now we will use the Telerik Grid to implement a file list rather than an HTML table.
<% Html.Telerik().Grid<FileModel>()
        .Name("filelist")
        .DataKeys(key => key.Add(x => x.FullPath))
        .Columns(columns =>
        {
            columns.Bound(x => x.FullPath).Format(
              "<input type='checkbox'  value='{0}'>"
              ).Encoded(false).Width(22).Title("");
            columns.Bound(x => x.Name).ClientTemplate(
              "<img width='16' height='16' alt='<#= CategoryText #>' src='"
              + Url.Content("~/Content/Images/") +
              "<#= CategoryText #>.png'  style= 'vertical-align:middle;'/>" +
              "<span id='<#= FullPath #>_span' style='padding-left" +
              ": 2px;'> <#= Name #></span>").Title("Name");
            columns.Bound(x => x.Created).Format("{0:g}").Title(
                          "Date created").ReadOnly(true);
            columns.Bound(x => x.Accessed).Format("{0:g}").Title(
                          "Date modified").ReadOnly(true);
            columns.Bound(x => x.IsFolder).Hidden(true);
            columns.Bound(x => x.FullPath).Hidden(true);

        })
        .DataBinding(dataBinding => dataBinding.Ajax()
                .Select("SelectFiles", "Explorer", new { filePath = Model.FullPath })
                )
        .Pageable(pager => pager.PageSize(Int32.MaxValue).Style(GridPagerStyles.Status))
        .Sortable(sorting => sorting.OrderBy(sortorder =>
                  sortorder.Add(x => x.Accessed).Descending()))
        .Selectable()
        .ClientEvents(events =>
           events.OnRowSelect("onRowSelected").OnDataBound("onFileListDataBound"))
        .HtmlAttributes(new { style = "text-align:left; border:none;" })
        .Render();
%>
AJAX binding
Add a new action method which is decorated with GridActionAttribute and returns a result of type IGridModel. Both the attribute and the result type are mandatory.
[GridAction]
public ActionResult SelectFiles(string filePath)
{
    IList<FileModel> files =
       FileModel.GetFiles(filePath == "/" ? "" : filePath);

    return View(new GridModel<FileModel>
    {
        Total = files.Count,
        Data = files
    });
}
Configure the grid to use the action method.
.DataBinding(dataBinding => dataBinding.Ajax()
.Select("SelectFiles", "Explorer", new { filePath = Model.FullPath })
)
If the grid is configured to use AJAX binding and is not initially bound (using server binding), it will request the action method and data bind itself as soon as the page is loaded.
Column definition
Use column format
columns.Bound(x =>
  x.FullPath).Format("<input type='checkbox' value='{0}'>").
  Encoded(false).Width(22).Title("");
The value of the checkbox is bound to FullPath.
columns.Bound(x => x.Created).Format("{0:g}").Title(
  "Date created").ReadOnly(true);
The display format for the "Created" column is set to “[short date] [short time]”.
Use client template
columns.Bound(x => x.Name).ClientTemplate(
  "<img width='16' height='16' alt='<#= CategoryText #>' src='" +
  Url.Content("~/Content/Images/")+
  "<#= CategoryText #>.png'  style= 'vertical-align:middle;'/>" +
  "<span id='<#= FullPath #>_span' style='padding-left: " +
  "2px;'> <#= Name #></span>").Title("Name");
This column will display a file icon beside the file name.
Sorting configuration
You can customize the sorting behavior by using the Sortable() method. It allows you to enable sorting based on some conditions.
.Sortable(sorting =>
  sorting.OrderBy(sortorder => sortorder.Add(x => x.Accessed).Descending()))
Pager configuration
You can customize the pager by using the Pageable(Action<(Of <<'(GridPagerSettingsBuilder>)>>)) method. It allows you to do the following:
- Set the initial page via the
PageTo(Int32)method. - Enable paging based on some condition via the
Enabled(Boolean)method. - Change the page size via the
PageSize(Int32)method. - Change the pager position via the
Position(GridPagerPosition)method. - Set the total number of records of your datasource via the
Total(Int32)method. - Change the pager style via the
Style(GridPagerStyles)method.
.Pageable(pager => pager.PageSize(Int32.MaxValue).Style(GridPagerStyles.Status))
Client events
Telerik Grid for ASP.NET MVC exposes the following client-side events:
OnLoad- raised when the grid is initialized.OnColumnReorder- raised when the user reorders a grid column.OnColumnResize- raised when the user resizes a grid column.OnDetailViewCollapse- raised when the user collapses a detail view.OnDetailViewExpand- raised when the user expands a detail view.OnDelete- raised when the user deletes a grid row.OnDataBinding- raised when the grid is binding (AJAX or Web-Service).OnDataBound- raised when the grid is bound (AJAX or Web-Service).OnEdit- raised when the user edits or inserts a row.OnError- raised when an error occurs during databinding.OnRowDataBound- raised when a row of the grid is databound.OnRowSelect- raised when the user selects a row.OnSave- raised when the user saves a row.
In our case, we use OnRowSelect and OnDataBound. When a row selected, if this row is a directory, then rebind the grid with sub-folders and sub-files. If the row is a file, execute the download action automatically. In the OnDataBound event hander, bind the checkboxes to the “click” event handler by using jQuery. One thing I need to bring out is, the checkboxes are generated after data binding because this grid uses AJAXx binding. So don’t try to bind the checkboxes to the “click” event handler on the document.ready event. It will not work.
.ClientEvents(events =>
   events.OnRowSelect("onRowSelected").OnDataBound("onFileListDataBound"))
function onFileListDataBound(e) {
    $(':checkbox').click(function () {
        var list = new Object();
        var i = 0;
        var filename = '<%= Model.FullPath %>';
        var path = getApplicationPath();
        $("input:checkbox:checked").each(function () {
             list[i++] = $(this).val();
        });

        $.ajax({
            type: "POST",
            url: path + "Explorer/LoadActionLinks",
            data: { path: filename, list: list },
            cache: false,
            dataType: "html",
            success: function (data) {
                $('#commands').html(data);
            }
        })
    });
    $('.noselect').disableTextSelect();
    //No text selection on elements with a class of 'noSelect'
}

function onRowSelected(e) {
    var grid = $(this).data('tGrid');
    var filePath = e.row.cells[grid.columns.length - 1].innerHTML;
    var isFolder = e.row.cells[grid.columns.length - 2].innerHTML == "true";
    if (isFolder) {
        grid.rebind({ filePath: filePath });
        loadActionLinks(filePath);
    } else {
        path = getApplicationPath() + "Explorer/DownloadFile/?file=" + filePath;
        window.location.href = path;
    }
}
Get the grid client side object
var grid = $(“#filelist”).data('tGrid');
Rebind
The rebind method rebinds a client-side bound grid. You can pass additional arguments to the action method or the Web Service method using rebind.
var grid = $(“#filelist”).data('tGrid');
grid.rebind({ filePath: filePath });
Use JavaScript to execute action result
Although we know how to use AJAX to call a controller action to update some parts of a page, we haven’t seen how to update the page with a new URL in JavaScript. Actually it’s pretty easy; what you need to do is set window.location.href.
path = getApplicationPath() + "Explorer/DownloadFile/?file=" + filePath;
window.location.href = path;
PanelBar
The PanelBar is made of PanelBarItem objects which represent the headers of the collapsible content. We add a PanelBar as a title bar, which includes action links and a location combobox.
![]()
A PanelBar can show/hide its content or child items on the client side. Expanding/collapsing the item will show/hide its content.
Here is how to define a PanelBar in Server Explorer:
<% Html.Telerik().PanelBar()
        .Name("titlebar")
        .Items(title =>
        {
            title.Add()
                .Text("Server Explorer")
                .Content(() =>
                {%>
    <div id="commands">
        <% Html.RenderPartial("ActionLinks", Model.SubFolders.FirstOrDefault());%>
    </div>
    <%})
              .Expanded(true);
        })
      .Render();
    %>
Content
The PanelBar gives you the ability to define regular HTML as a content of the corresponding PanelBarItem.
.Content(() =>
                    {%>
        <div id="commands">
            <% Html.RenderPartial("ActionLinks", Model.SubFolders.FirstOrDefault());%>
        </div>
        <%})
Get PanelBar client object
var panel = $("#titlebar").data("tPanelBar");
Client-side events
OnLoadevent - raised when the component is loaded on the client. To handle the OnLoad event, use the overload of theOnLoadmethod which can accept the name of the JavaScript function as a string parameter orAction. TheActionparameter will be directly rendered on the client without any modification.OnExpandevent - raised on expanding of the item. To handle theOnExpandevent, you can use the overload of theOnExpandmethod which can accept the name of the JavaScript function as a string parameter orAction. TheActionparameter will be directly rendered on the client without any modification.OnCollapseevent - raised on collapsing of the item. To handle theOnCollapseevent, you can use the overload of theOnCollapsemethod which can accept the name of the JavaScript function as a string param orAction. TheActionparameter will be directly rendered on the client without any modification.OnSelectevent - raised when one of the component's items is selected. To handle theOnSelectevent, you can use the overload of theOnSelectmethod which can accept the name of the JavaScript function as a string param orAction. TheActionparameter will be directly rendered on the client without any modification.
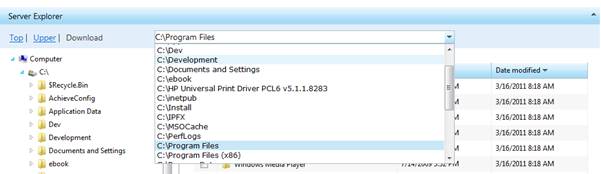
ComboBox
There is a location combobox in the PanelBar. It shows the current folder path. Typing a path in the location combobox, the file list grid will display the files and folders under this path, if the path is a valid path. The dropdown list will list all the sibling folders.
Here is the code to define the location combobox in Server Explorer:
<%= Html.Telerik().ComboBox()
    .Name("location")
    .AutoFill(true)
    .HtmlAttributes(new { style = "width:100%" })
    .Items(item =>
    {
        item.Add().Text(Model.FullPath == "/" ? "Computer" :
           Model.FullName).Value(Model.FullPath).Selected(true);
    })
    .DataBinding(binding => binding.Ajax().Select("LocationLoading",
                 "Explorer", new {filePath = Model.FullPath }))
    .ClientEvents(events => events.OnChange("onLocationChange"))
    .HighlightFirstMatch(false)
%>
The simplest way to populate the combobox with items is to use the Items method. With it, you can add DropDownItem objects.
.Items(item =>
    {
        item.Add().Text(Model.FullPath == "/" ? "Computer" :
           Model.FullName).Value(Model.FullPath).Selected(true);
    })
AJAX binding
Configure the combobox to use AJAX binding to list the sibling folders.
Add a new action method which returns the result of type JsonResult.
[HttpPost]
public ActionResult LocationLoading(string filePath)
{
    filePath = FileModel.Decode(filePath);
    SelectList result = null;
    if (filePath != "\\")
    {
        if (Directory.Exists(filePath))
        {
            DirectoryInfo di = new DirectoryInfo(filePath);
            if (di.Parent != null)
            {
                filePath = FileModel.Encode(di.Parent.FullName);
            }
            else
                filePath = "";
        }
        else
            filePath = "";
        IList<FileModel> files = FileModel.GeFolders(filePath);
        result = new SelectList(files, "FullPath", "FullName", filePath);
    }
    else
    {
        result  = new SelectList(new[]
                    {
                        new { Value = "/", Name = "Computer" },
                    }
           , "Value", "Name", filePath);

    }

    return new JsonResult { Data = result };
}
Configure the combobox to use the action method:
.DataBinding(binding => binding.Ajax().Select("LocationLoading",
            "Explorer", new {filePath = Model.FullPath }))
Get the combobox client object
var combobox = $(‘#location’).data('tComboBox');
Client events
ComboBox exposes the following client-side events:
OnLoad- raised when the combobox is initialized.OnChange- raised when the value of the combobox is changed.OnOpen- raised when the drop-down list is opening.OnClose- raised when the drop-down list is closingOnDataBinding- raised every time the combobox is being databound on the client-side (during AJAX and WebService binding).OnDataBound- raised after the combobox is databound on the client-side (during AJAX and WebService binding).OnError- raised when there is an error after the AJAX request (during AJAX or WebService binding).
In our “OnChanged” event handler, the file list will change with the input path.
.ClientEvents(events => events.OnChange("onLocationChange"))
function onLocationChange() {
        var combobox = $(this).data('tComboBox');
        var inputfile = combobox.value();
        var curfile = '<%= Model.FullPath %>';
        if (inputfile.toLowerCase() != curfile.toLowerCase())
            selectFolder(inputfile);
}

function selectFolder(folder) {
    var grid = $("#filelist").data('tGrid');
    grid.rebind({ filePath: folder });
    loadActionLinks(folder);
}

function loadActionLinks(file) {
    var path = getApplicationPath();
    $.ajax({
        type: "POST",
        url: path + "Explorer/LoadActionLinks",
        data: { path: file },
        cache: false,
        dataType: "html",
        success: function (data) {
            $('#commands').html(data);
        },
        error: function (req, status, error) {

            alert("failed.");
        }
    });
}
Conclusion
In this article, we went through how to use the TreeView, Grid, PanelBar, and TreeView of Telerik MVC Extensions. There are other UI components like Window, TabStrip, Menu, Calendar, DatePicker, Editor, and NumericTextBox. All these components are pure ASP.NET MVC components and based on jQuery. There are plenty of themes to select. Also, you can customize the UI with your own style.
发表评论
 NerryAcubs[37.115.216.*]2024/3/7 11:09:57#491
Hello from Happykiddi.
Hello from Kiddishop.
Hey I like your site and I hope we can connect! I have a TON of experience working with local businesses generating more traffic for their websites. I'd love to offer some of my time to you and show you how I can help. Please give me a call or text 718-673-9411. - Nick
Very good article. I certainly love this site. Stick with it!
Im thankful for the blog.Really thank you! Really Great.
I think this is a real great article. Cool.
Incredibly helpful info especially the last aspect I care for such facts a great deal. I was looking for this particular info for a extended time. Thank you and very good luck.
Im obliged for the blog post.Much thanks again.
Normally I don at read article on blogs, but I wish to say that this write-up very pressured me to take a look at and do so! Your writing taste has been amazed me. Thanks, quite nice article.
Money and freedom is the best way to change, may
Well I truly enjoyed reading it. This information offered by you is very effective for proper planning.
Some truly superb posts on this internet site , regards for contribution.
pretty useful material, overall I imagine this is worthy of a bookmark, thanks
Well My spouse and i definitely enjoyed studying the idea. This idea procured simply by you is very constructive forever planning.
Im obliged for the blog.Really looking forward to read more.
Your method of describing the whole thing in this paragraph is really nice, all be able to effortlessly be aware of it, Thanks a lot.
Very informative blog post. Really Cool.
Really enjoyed this article post. Fantastic.
Very neat post.Really looking forward to read more. Cool.
Im thankful for the article post.Really thank you! Want more.
It as not that I want to copy your web site, but I really like the pattern. Could you let me know which style are you using? Or was it custom made?
Say, you got a nice blog.Thanks Again. Cool.
Thank you ever so for you post.Much thanks again. Awesome.
Thanks a lot for the article post.Thanks Again. Cool.
You should take part in a contest for one of the best blogs on the web. I will recommend this site!
The text in your content seem to be running off the screen in Opera.
I will bookmark your blog and check again here regularly.
pretty useful material, overall I imagine this is really worth a bookmark, thanks
Wow, superb blog layout! How lengthy have you ever been blogging for?
Very informative article.Much thanks again. Want more.
Im grateful for the blog article.Really thank you! Want more.
You have made some good points there. I checked on the web for more info about the issue and found most people will go along with your views on this site.
you ave gotten an awesome weblog right here! would you prefer to make some invite posts on my blog?
I think this is a real great blog article.Really looking forward to read more. Want more.
Nice post. I learn something new and challenging on blogs I
Real wonderful info can be found on blog.
Very good blog.Much thanks again. Great.
This is a really good tip especially to those new to the blogosphere. Simple but very precise info Thanks for sharing this one. A must read article!
Thank you for helping out, excellent info.
That is a very good tip particularly to those fresh to the blogosphere. Short but very precise info Thanks for sharing this one. A must read article!
Wonderful work! This is the type of information that should be shared around the web. Shame on Google for not positioning this post higher! Come on over and visit my website. Thanks =)
spraying METALS into our atmosphere is going to be out in the sun.
I truly appreciate this blog post.Much thanks again. Much obliged.
my family would It?s difficult to acquire knowledgeable folks during this topic, nevertheless, you be understood as do you know what you?re referring to! Thanks
I surely did not realize that. Learnt a thing new nowadays! Thanks for that.
Wow, wonderful blog structure! How long have you been running a blog for? you make running a blog look easy. The entire glance of your website is magnificent, let alone the content!
This is one awesome article.Thanks Again. Much obliged.
This is one awesome post.Really looking forward to read more. Will read on...
I truly appreciate this blog.Much thanks again. Will read on
It generally takes about three years to complete that with.